ISSUE: Upon reset of either device by either system reboot, power failure or USB unplugging the levels of the USB card drop to 25 percent. This behavior is by design by the Xilica Engineers for safety at boot up.
REQUIRES FIRMWARE solaro_k02_usb_v9.9.xfw (obtain from )
SOLUTIONS: There are several options that will be described in detail below.
Automatic Commands from Wolfvision(Power-on)
On-Demand Commands from Wolfvision Control Centre
On-Demand Commands from Xilica Xtouch(logic solution)
HEX CODES AND THIRD-PARTY CONTROL NAMES
For the purposes of this example, we have used the following codes and names on the devices. You are free to use these codes and control names but the naming convention may interfere with your current system. (NOTE: when making control names, they are case sensitive)
USB SPEAKER
Xilica Control Name = “SpkrVol”
HEX convert = SET SpkrVol 100: “5345542053706b72566f6c203130300d”
USB MIC
Xilica Control Name = “MicVol”
HEX Convert = SET MicVol 100: “534554204d6963566f6c203130300d”
Automatic Commands from Wolfvision(Power ON)
During the “Power-On” sequence of any Cynap, the device can send out control commands via the Peripheral Control option tab in the menu.
Start by naming the USB Mic Volume in Xilica Designer. Hold down the CTRL key + right mouse click to create a Third Party control name (Note: this is case sensitive)

In this example, it is named MicVol.

Press ok when done
When successful in creating a control name to the Mic Volume, a RED control indicator will illuminate in the upper lefthand corner of the fader as shown below.

Repeat the previous steps for the USB speaker but name it “SpkrVol”
Log on the Wolfvision Cynap by entering the IP address into any web browser.
Enter the Password(default is “Password” unless it has been changed)
Navigate to the Peripheral Control Tab at the bottom of the lefthand menu

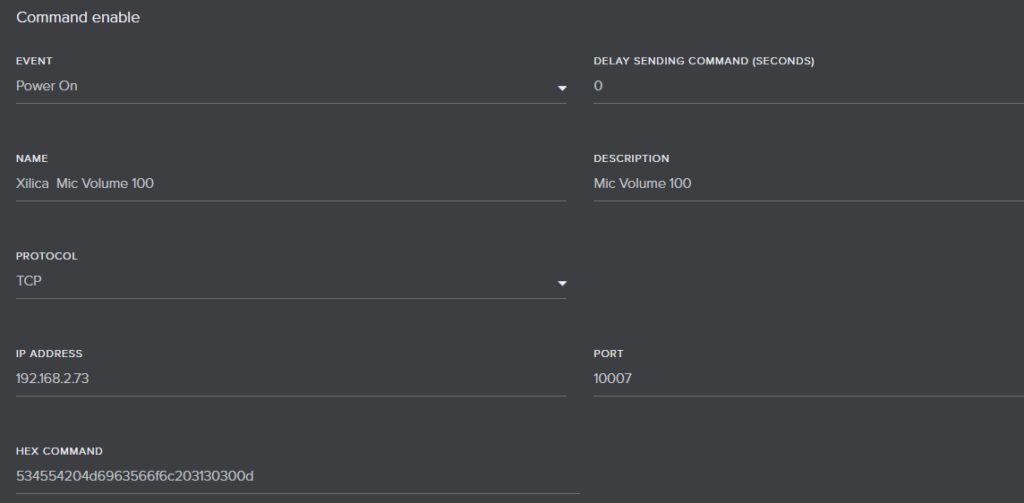
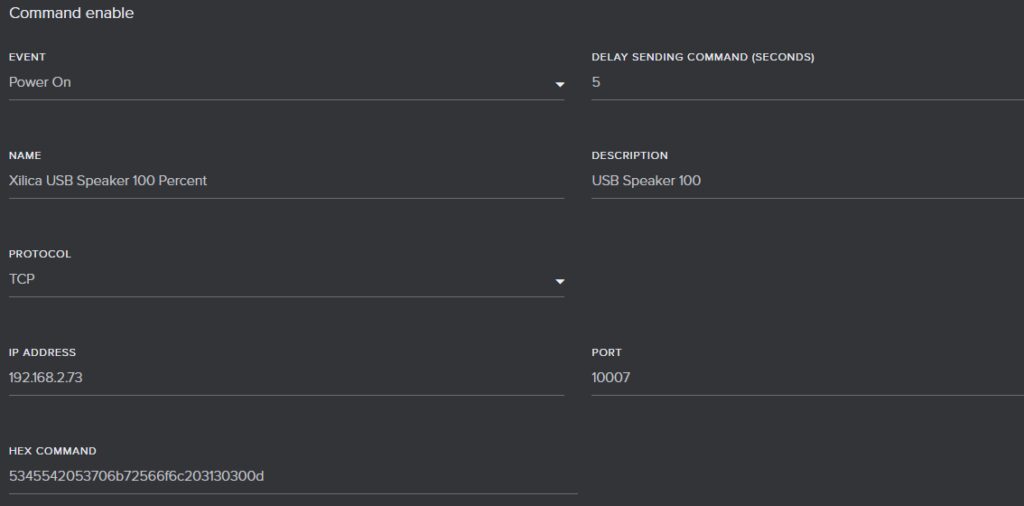
From the EVENT drop-down list select POWER-ON

Enter the data in the fields(see HEX CODES AND THIRD-PARTY CONTROL NAMES)
The IP address will be the IP address of the Xilica Solaro in your system that you are wanting to control. For this example, the IP address shows the IP address of the Solaro for this example
USB Mic

USB Speaker(Note the delay of 5 seconds in sending the command. This will give some time for the previous command to complete)

NOTE: In the HEX field, there can be no spaces. The name and description are custom fields and can be you please.
Once the data is entered, please press “SAVE”. This will activate the control and prompt a “TEST IT NOW” icon to appear


Before pressing the “TEST IT NOW” button, return to Xilica Designer and load the design to the Solaro by pressing the “Load design to Device(s)” Icon

Ensure that you are ONLINE with the Solaro and open the USB input card.
Slide the Control Speaker and Mic to Zero.

(Note the two RED control indicators in each block)
With the Wolfvision open in a browser and Xilica Designer open beside the Wolfvision screen, press the “TEST IT NOW” to ensure commands are working and volumes are being set to one hundred.


On-Demand Commands From Wolfvision Control Centre
On occasion the user may need to reset the levels in the Xilica due to a firmware update of the Xilica Solaro, power cycle of the Solaro or USB disconnection. The following will describe the on-demand solution of resetting the levels to 100 percent from the Wolfvision Command Centre.
Start by naming the USB Mic Volume in Xilica designer. Hold down the CTRL key + right mouse click to create a third party control name(Note: this is case sensitive)

In this example, it is named MicVol.

Press ok when done
When successful in creating a control name to the Mic Volume, a RED control indicator will illuminate in the upper lefthand corner of the fader as shown below.

Repeat the previous steps for the USB speaker but name it “SpkrVol”
Log on the Wolfvision Cynap by entering the IP address into any web browser.
Enter the Password (default is “Password” unless it has been changed)
Navigate to the Peripheral Control Tab at the bottom of the lefthand menu

From the EVENT drop-down list select C1

Enter all the data in the fields(see HEX CODES AND THIRD-PARTY CONTROL NAMES)
The IP address will be the IP address of the Xilica Solaro in your system that you are wanting to control. For this example, the IP address shows the IP address of the Solaro for this example.

Be sure to have the “USE USB MIC 100 PERCENT AS NAME IN CONTROL PANEL” enabled
NOTE: In the HEX field, there can be no spaces. The name and description are custom fields and can be as you please.
Once the data is entered, please press “SAVE”. This will activate the control and prompt a “TEST IT NOW” icon to appear


Before pressing the “TEST IT NOW” button, return to Xilica Designer and load the design to the Solaro by pressing the “Load design to Device(s)” Icon

Ensure that you are ONLINE with the Solaro and open the USB input card.
Slide the Control Speaker and Mic to Zero.

(Note the two RED control indicators in each block)
With the Wolfvision open in a browser and Xilica Designer open beside the Wolfvision screen, press the “TEST IT NOW” to ensure commands are working and volumes are being set to one hundred.


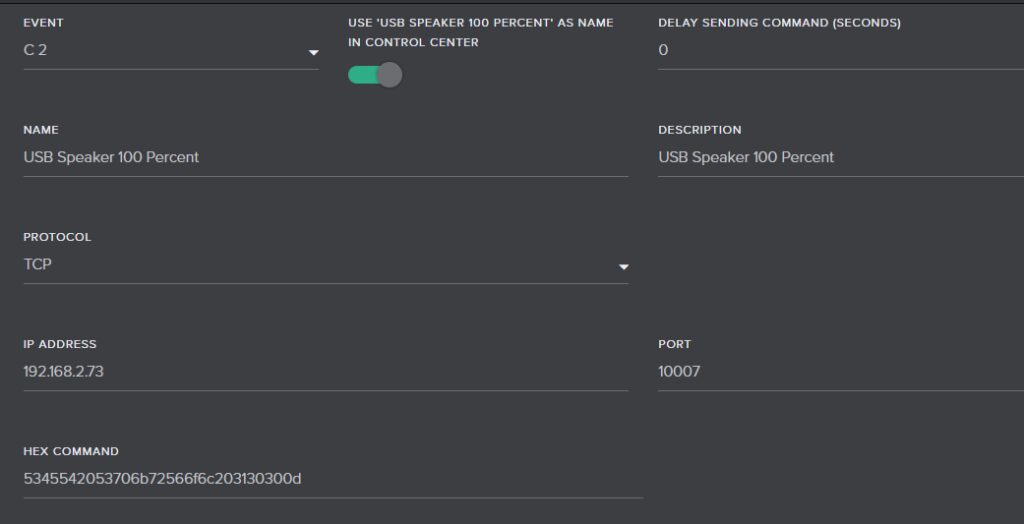
From the EVENT drop-down list select C2

Enter all the data in the fields (see HEX CODES AND THIRD-PARTY CONTROL NAMES)
The IP address will be the IP address of the Xilica Solaro in your system that you are wanting to control. For this example, the IP address shows the IP address of the Solaro for this example.

Be sure to have the “USE USB SPEAKER 100 PERCENT AS NAME IN CONTROL PANEL” enabled
NOTE: In the HEX field, there can be no spaces. The name and description are custom fields and can be as you please.
Once the data is entered, please press “SAVE”. This will activate the control and prompt a “TEST IT NOW” icon to appear


Before pressing the “TEST IT NOW” button, return to Xilica Designer and load the design to the Solaro by pressing the “Load design to Device(s)” Icon

Ensure that you are ONLINE with the Solaro and open the USB input card.
Slide the Control Speaker and Mic to Zero.
(Note the two RED control indicators in each block)
With the Wolfvision open in a browser and Xilica Designer open beside the Wolfvision screen, press the “TEST IT NOW” to ensure commands are working and volumes are being set to one hundred.


Open the control centre on the main page of the Wolfvision Cynap. Two icons will now appear that have been created through the control process.

Slide the Control Speaker and Mic to Zero.

Once either one of the icons are pressed, the corresponing volume will move to one hundred.

On-Demand Commands From Xilica Xtouch(logic solution)
On occasion the user may want to reset the levels in Xilica due to a firmware update of the Xilica Solaro, power cycle of the Solaro or USB disconnection. The following will describe the on-demand solution of resetting the levels to 100 percent from Xtouch panels or Designer.
While holding down the CTRL key, drag the USB Speaker Volume into the Project Controller section of Designer

This now gives an element controllable by logic

Next insert a Numeric Value Holder Module and modify Triger mode to “Level Trigger”

Insert a Numeric Constant Module and modify the Constant Values to “100”

Finally, insert a Momentary ON/OFF Button. This is what you can place in an XTouch screen and activate the setting

Repeat previous steps for the Mic Volume and have a logic lay out like below.

Save and “Load Design to Device(s)”

This can now be tested by going online and opening Project Controller and the USB input card.
The levels are set to zero.(Note: if using this method solely, the RED control indicator in the upper lefthand corner will not be present.)

Once triggered by the UI object(momentary button), the volume will be set to one hundred.

—END—